Showing posts with label How To.... Show all posts

Thursday, December 20, 2012

Peanut Butter Doggie Treats

Have a dog? Have friends with dogs? Ever try one of their treats, even just a little nibble to see what they taste like? Well try these on for size- homemade peanut butter dog treats! I don't even have a dog, but I was a bit at a loss for what to make for the holidays this year for some of my friends. And somehow, I arrived at the idea to make some dog treats. That way I can kind of give a gift to my friend for being a good friend, and their dog for being a good dog. Perfect! I have a little bone shaped cookie cutter that was perfect for the job, but you should cut these into whatever shape and size will suit the dog or dogs they are intended for. Your dog(s) will be in for quite the...treat! (Sorry couldn't avoid the pun on that one...) Enjoy! :)

1 C. wheat flour (regular all-purpose flour is suitable as well)
1 C. corn flour
1 C. corn meal
1/2 C. smooth peanut butter
1 C. water
1/3 C. oil
1 tsp. vanilla
1 egg

Preheat oven to 375F, and grease baking sheet. In a large bowl, mix together the dry ingredients. In a microwave safe cup, heat peanut butter until it is a thinner liquid so it will be easier to mix in your dough. In a smaller bowl combine waiter, oil, vanilla, egg, and liquefied peanut butter. Stir this mixture into the dry ingredients bowl, and mix to make a stiff dough you can roll out. On a floured surface, roll out the dough to about 1/4" thick and cut it into whatever shape you choose. Bake for 12-15 minutes, and allow to cool before storing. 

Put cooled treats in a large jar with a tag sent to the lucky puppy to make personalized gifts!

Love,
H.

Wednesday, September 26, 2012

Homemade Apple Butter

Iiiiiiiiiitttts apple season! One of my favorite times of year. When apples are in season, I think I could honestly eat two a day. They are beautiful colors with anything from a sweet to sour flavor. This last week when my roommate and I both had a night to relax together and make something, we decided to make apple butter. The day before she had gone apple picking with her family and brought back a big bag of Gravenstein apples and some half pint mason jars.


Here's what you can do at home to get the same chunky spicy spread:

You Will Need:
At least 4-5 lbs fresh apples
2 C. water
2 C. apple cider vinegar
4 C. sugar
4 Tsp. cinnamon
1 Tsp. allspice
1/2 Tsp. ground cloves
Sterilized glass jars with lids
A friend to help you

PROCESS
-Wash and quarter apples
-Add to a large pot and bring to a boil, along water and apple cider vinegar
-Reduce heat and simmer for about 40-45 minutes
-Remove from heat and pass through a food mill or some sort of strainer to separate out the seeds and stems :)
-Add sugar and spices
-Simmer on low heat for about 2 hours, stirring constantly. You will want to have a friend around to help you for this part.

-In the mean time as you and your partner are taking turns stirring, prepare the jars for sterilization. There are two general methods, wet and dry sterilization. You can boil your jars to sterilize them, but I find this is too much hassle in my small kitchen. Instead, we washed our jars with soap and warm water and allowed them to dry. Then we put them in the oven on a cookie sheet lined with parchment paper, and allowed the jars to sterilize in the oven for about 30 minutes on 425F.

-As the apple butter mixture thickens, make sure to keep stirring and scraping the bottom of the pot so that nothing sticks and no layer of burned butter at the bottom forms. What you end up with is a very fragrant chunky syrup mix that can be ladled carefully into the jars. It will be mostly a matter of preference, but you will want to get a thick consistency. To test, spoon a small amount on a plate that has been sitting in your freezer. The apple butter should set up and not be too runny or think on a cold plate if it has cooked and reduced down enough.

-H.BOMB

Saturday, August 25, 2012

All Purpose Coconut Body Moisturizer

SUPER EASY D.I.Y. BODY PRODUCT!

Try this out next time you need a new jar of all purpose moisturizing cream. It takes practically no time at all, and will always be completely custom, just how you like it. Also, this recipe is 100% vegan for all you cruelty free folks out there :D


All you need, really, is a jar of organic coconut oil. An electric mixer will come in handy too, although you could hand whisk this yourself, if you want to work out and tone those arm muscles. The choice is yours!

Just whip up the coconut oil (which will be a kind of soft but solid consistency at room temperature) until it is soft and airy like fresh whipped cream or meringue. You can leave it as is, unaltered coconut oil, or you can add other oils to make a unique scent or aromatherapy body moisturizer. I split mine into two smaller jars so that I could have more to choose from later.

In both half batches I used vitamin E oil which is good for the skin, and magnesium oil which is also good for skin but can also aid in muscle relaxation and pain relief. In one jar, I added about 20 drops each of peppermint oil and spearmint oil. This relaxing minty one I like to use on my feet and legs after I get home from work and after  showering. In the other jar, I added about 25 drops of grapefruit oil and about 20 drops of lemon extract. This refreshing minty one I like to use everyday as a hand cream. The jars of coconut moisturizer will harden up again at room temperature, but once you scoop some out with your fingers it will literally begin to melt as you apply it to your body.

Enjoy!

With love,
H.BOMB


Saturday, June 16, 2012

Take Out and Give Back


Have you ever bought something from a resale shop, and once you get home you find that there is an extra little goodie that was left inside of it? Like a cool pin or a crisp dollar bill? I bet it makes you feel like a little kid who had just uncovered some buried treasure. Or maybe a little like...

Courtesy of reactiongifs.com
Well, I have been collecting the fortunes from my fortune cookies for years now, and although I just can't bring myself to throw them away, I know the perfect way to pass them on: to turn them into buried treasure. 


For the past few days, I have been working on my annual closet clean out. I am constantly having to make room for the new by donating the old to thrift stores so someone else can enjoy what I once did. I thought the perfect way to pass on a little fortune and positivity, was to put my fortune slips in the pockets of clothing items that I am giving away. I know that one of my favorite parts of Chinese food, is the future-telling dessert. Those wise words and lucky numbers just always seem to make my day a little brighter. I guess what I am hoping by hiding them in the pockets of my donated clothing, is that it will make someone else's day a little brighter too. So, if you regularly save these mementos from your Chinese take-out, maybe it's time to pass them on?

-Ianna

Friday, June 8, 2012

A Sweet Display of Sour

Just having a little fun arranging flowers, and painting with light.
As many of you know, a new month at Love Handling Food brings with it a new "Flavor of the Month", and Helaina and I are particularly excited about this month's flavor: lemon.

Lemon is easily one of both Helaina and my favorite flavors to cook and create with. It adds a burst of fantastic zest to a variety of dishes such as vegetables, meats, and of course, desserts. It also lends an aesthetic appeal to many creations. 

  
To introduce June's lemon flavor, I decided to create a floral arrangement that incorporated this citrus. I went to the store and picked up beautiful orange and red tipped roses, in addition to some wonderfully scented, fuchsia colored delphiniums. I then purchased a bag of lemons, and set home to get trimming and arranging.

A trick for this arrangement idea, is to use a vase within a vase. The inner vase holds the floral arrangement, while the space between the outer and inner vase holds the round lemon slices. Using a vase within a vase also prevents the acidic lemon juice from quickly degrading how long the cut flowers last, and it helps to hold the lemons in place.

Once the arrangement is made, I poured water in both the vase holding the flowers, and the vase holding the lemons. The water really helps to keep the lemon slices looking fresh for a longer amount of time.


As you can see, lemons can be used for much more than cooking. What sorts of arrangements and other uses for lemons can you come up with?

-Ianna

Sunday, January 22, 2012

Brown Sugar Coffee Scrub

Finally, a new recipe to enjoy for Flavor of the Month! Apologies for the delayed post everyone. This month we have been consuming a lot of coffee and thought we could share some of our secrets with you all. Instead of a recipe to eat, this is a recipe is for a do-it-yourself body scrub to use in the shower. This scrub is absolutely delicious and leaves your skin soft, conditioned and moisturized. It can be used on your face or all over your body. Don't worry if you get some in your mouth too- its sweet and is ok if swallowed in small amounts. The sugar and coffee give it a rough gritty texture that feels great.

INGREDIENTS                                      ALSO

Coffee Grounds                                       A Re-purposed glass jar
Brown Sugar
White Sugar
Olive Oil
Vitamin E Oil
Tea Tree Oil

Mix together about two parts coffee grounds, one part brown sugar, and one part white sugar in a big bowl. You only need as much as will fill your jar, in fact you probably will be able to use the left over grounds from one pot of coffee. Add to this a fairly liberal amount of olive oil, maybe about a third as much Vitamin E Oil, and about 5-10 drops of Tea Tree oil. If you don't have Vitamin E Oil handy, don't worry Olive Oil by itself is also fine. I like the consistency to be moist but gritty- your own preference is what matters though. If your skin tends to be dry, add more oil. If your skin tends to be oily, increase how much coffee and sugar you use. Enjoy!

Thursday, November 3, 2011

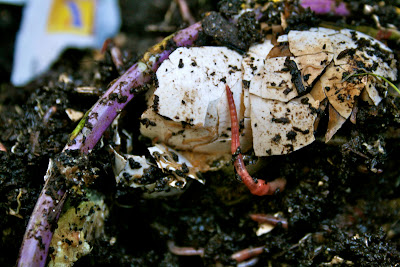
Worm Compost 101


Why compost?  

Compost is a great way to replace the nutrients the plants in your garden use to grow. Plants “eat” up the phosphorus, nitrogen, and other micronutrients in the soil as they grow. One of the main differences between organic and conventional farming is the attention to maintaining the health of the soil. In conventional farming, chemical fertilizers are used (at a great cost financially and environmentally) to replace nutrients in the soil. This process is very crop-focused, not giving much attention to the life contained in the soil. Organic food production, on the other hand, tends to focus on this life and seeks to maintain it health in order to yield a more nutritious crop. Think about it this way: we eat plants, and plants eat what’s in the soil. This means it is incredibly important to feed the soil! But how does one feed their soil? For mine and Ianna’s particular garden, and living situation, the simplest and most effective solution is to have a worm compost bin in the back yard. It works great; we are growing a garden, and live in a house with five other people- so we make a lot of food waste. Having the compost both feeds our garden and decreases what we contribute to the landfills.

How do I start my compost? 

There are really only two things you need to invest in to get your own worm compost started, and if you are lucky, you might not have to financially invest at all. First, you obviously need some worms. I got mine locally from an organic farmer that I found through Craigslist. I am fortunate enough to live in a community that is very friendly to these sorts of things, so I actually didn’t have to look very hard. If you aren’t as lucky as me, you can easily find worms online for just this purpose. Sites will usually tell you that Red Wigglers are the best worm species for this type of project, which is also what I have. You also can check your local nursery to see if they know of any local sources for this. My worms cost me an investment of $25 dollars for about 10lbs of worms. Secondly, you need a bin of some sort to put your new pets in. I have a 20 gallon tub I got at the hardware store for about $17 dollars which I drilled holes in the bottom and the top of for ventilation and drainage purposes.  

Fortunately, the last ingredients for this project are things I’m sure you all have plenty of- soil, food scraps and newspapers! To begin with, you will need (in addition to the worms) soil from your yard or garden, a little sand to provide extra grit, shredded newspapers and food scraps. You will make a bed for your worms by incorporating the soil and sand, and layering the mixture in your container with the shredded paper. If you also have food scraps upon beginning, add them into the container in small pockets and bury them. When you add worms to the container, they will make their way down into the soil and begin eating your leftovers. This is because the worms are photosensitive and want to be in the dark moist soil. You will want to finish by adding another layer of newspaper on the top to shade them a bit more and retain moisture. Even if your container has a lid this is still a good idea because it provides further insulation from the sun and other elements, as well as critters you don’t want in your compost like slugs and flies.


How do I maintain my compost? 

The majority of your food scraps can be used for your compost. Fruit and vegetable scraps, egg shells, coffee grounds and teabags (with no staples) can all go into your compost. Things to avoid include grains, meat and dairy, fruit pits and large seeds, and citrus peels and flesh. You will need some sort of bucket or container to put your food scraps in for collecting, and every few days you will add your collection to your compost the same way as I describe above: make small pockets, add food scraps, bury. From time to time you may want to add a bit more water and sand; the consistency you want to maintain will be something like moist and slightly gritty. Adding more newspaper scraps on occasion also never hurts. Your worms will essentially take care of everything themselves, just be sure to feed them well and maintain their habitat. 

Because your compost can be ongoing project of sorts, whenever you integrate it into your garden, you don’t have to use the entirety of your compost. I usually take about one third or so of it to use, and leave the rest to continue doing it’s compost-magic. Now, remember I mentioned the worms being photo-sensitive. In order to harvest some of your compost while leaving the majority of your worms intact in their habitat, put your container in the sun. What I do is remove the lid and newspaper layer on top and expose the compost to light. This makes any worms toward the top start to wriggle down deeper into the compost. After a few minutes I take a shovel and harvest the top few inches of compost to be integrated into my soil. Here I should add your worm population will be limited by two things: the size of your container and the amount of food scraps they will receive. For this reason, I have tried to give fairly loose guidelines for the entire process, adding general tips I find work well for me. 


-H!

To learn more check out these websites I used when I was starting my worm compost:


Monday, October 31, 2011

Serving Up Memories


One thing Helaina and I love to do, is check out our local thrift shops. On a recent trip, we were both looking for things to craft into picture frames. I ended up coming across something perfect to hang on my wall that would hold mementos from my time traveling in Europe this past year. As necessary for this blog, yes, it relates to food! What I ended up buying was a wooden serving tray. In it, I arranged some favorite pictures from locales such as England and France. To spice it up, I hot glued some French lavender onto the arrangement, since it is a flower that will stand the test of time as it dries, and a quote reading, "you need not worry about the future" from a fortune cookie. I draped some beads over it, and voilà, a nice photo tray on my wall, which serves up some beautiful and delicious memories. So if you have a little time on your hands, an old serving tray or dish lying around, and pictures that long to be put on display, give it a try!

-Ianna 


Tuesday, October 25, 2011

Foodie Ideas! A Fruit Treasure Map


If we had to say what we enjoy more than food, it would have to be free food.  Someone recently gave us an idea to enjoy food in this most enjoyable way: Making a fruit map of the area that we live. Or, what we would like to call a Fruit Treasure Map. Since we thought this was a fantastic idea that appealed to our deep-rooted foodie sensibilities, we decided that this idea must be shared. The act is simple: Construct a map of your area, and go explore. Mark on your map where easily attainable, free fruit is growing, and you will eventually develop a selection of places to return and collect your fruity treasure. 

Here is one of the fruits Helaina and I have marked on our map, and have been collecting recently - a Pineapple-Guava:


Its sweet and lightly tart, complex flavor is truly addicting. Even if it is not growing in an area near you, we highly recommend giving it a try. We’re sorry we can’t tell you the location of our finds though. Everyone knows, pirates don’t share their treasure!

*Disclaimer – We are not promoting going into people’s gardens or something along those lines and taking fruit that people have put long and hard work into. Sometimes, fruit gets neglected in more public spaces. Just use your best judgment, and please, pick responsibly. :)

-Love Handing Food